Wednesday, January 22, 2025
Free pallet shed plans for a compact and functional shed

Build Your Dream Pallet Shed: Free Plans for a Compact Powerhouse
Tired of clutter overflowing your garage or garden? Yearning for a practical storage solution without breaking the bank? Then look no further! This article provides detailed, free plans for constructing a compact and surprisingly functional shed using reclaimed pallets. We'll guide you through every step, from material sourcing to final construction, ensuring a rewarding DIY project that maximizes space and minimizes cost.
Gathering Your Materials: The Foundation of Success
Before you even think about hammering a nail, source your materials. This project relies heavily on reclaimed pallets, offering a sustainable and cost-effective approach. Inspect pallets carefully. Look for sturdy, intact pallets free of rot, significant damage, or protruding nails. You’ll likely need at least 15-20 pallets depending on the desired size of your shed. Beyond pallets, gather the following:
- Strong screws (exterior-grade recommended)
- A sturdy level
- A drill with appropriate drill bits
- A hammer
- Measuring tape
- Safety glasses and work gloves
- Plywood or OSB for the roof and possibly some walls (optional, depending on pallet condition)
- Tarpaulin or roofing felt for waterproofing
- Concrete blocks or pressure-treated lumber for the foundation (optional, but recommended)
Remember, the quality of your materials directly impacts the shed's longevity and stability. Don’t rush this step!
Designing Your Compact Pallet Shed: Size and Structure
Our free plans focus on a compact, rectangular shed, ideal for smaller gardens or yards. We suggest dimensions of approximately 6 feet wide by 4 feet deep and 6 feet high. Adjust these dimensions to suit your needs and available space. Remember to factor in the size of the pallets you've sourced. Sketch out your design, considering the arrangement of the pallets to ensure structural integrity. For example, use complete, intact pallets for the primary structure and possibly use broken ones for infill.
Foundation Considerations
Building a simple foundation significantly extends your shed's lifespan and prevents moisture damage. A base of concrete blocks provides excellent drainage and leveling. Alternatively, use pressure-treated lumber for a more permanent, integrated foundation. Ensure the foundation is level before proceeding to the walls.
Construction: Building Your Pallet Powerhouse
Begin by constructing the floor frame using sturdy pallets, securing them firmly together with screws. Next, assemble the side walls, utilizing complete pallets as vertical supports. Carefully position each pallet, ensuring even spacing and alignment. For extra strength, consider using screws to join the pallets at several points along their length. After erecting the walls, construct the roof frame, attaching it securely to the top of the side walls. Finally, cover the roof with plywood or OSB sheets, then add your tarpaulin or roofing felt for weather protection.
Adding Finishing Touches
Once the structure is complete, add finishing touches. This might include adding a simple door using leftover pallet slats or purchasing a pre-made door. You can also consider painting the shed for aesthetics and to protect the wood from the elements. Remember to secure the door with hinges and a latch for added security.
Embrace the DIY Spirit: Reap the Rewards
Building your own pallet shed is a rewarding experience that offers a unique sense of accomplishment. This guide provides a solid foundation; feel free to customize your shed based on your specific requirements and creativity. Enjoy your new, functional, and cost-effective storage solution â€" a testament to your DIY skills and resourcefulness!

Affordable lean to shed blueprints for small outdoor spaces

Affordable Lean-To Shed Blueprints for Small Outdoor Spaces
Hey there, fellow DIYers! So, you're dreaming of a little extra storage space, a cozy potting shed, or maybe even a tiny workshop, but you're working with a small outdoor area and a tight budget? You've come to the right place! Lean-to sheds are fantastic solutions for maximizing limited space without breaking the bank. They're relatively simple to build, and this guide will walk you through finding and using affordable blueprints to create your perfect little shed.
Why Choose a Lean-To Shed?
Before we dive into blueprints, let's talk about why lean-to sheds are such a great choice, especially for smaller spaces. They're essentially sheds attached to an existing structure â€" your house, garage, or even a sturdy fence. This means you save on materials because you only need to build three walls instead of four! Plus, they often require less complex foundations, further saving you time and money.
Here’s what makes them so appealing:
- Space-saving: Perfect for compact yards.
- Cost-effective: Less material and often simpler construction.
- Versatile: Adaptable to various needs (storage, workshop, potting shed).
- Easy to build: A manageable project for DIY enthusiasts.
Finding Affordable Lean-To Shed Blueprints
Now, the fun part â€" finding those blueprints! You have a few great options:
Free Online Resources
Believe it or not, you can find surprisingly detailed and usable lean-to shed plans online for free! Websites like Instructables, Pinterest, and even some home improvement blogs often feature user-submitted plans. However, always carefully review the plans before starting, ensuring they match your skill level and the materials you can access.
Tip: When searching online, use specific keywords like "free lean-to shed plans 8x6" (adjusting the dimensions to your needs). The more specific your search, the better the results.
Affordable Blueprint Websites
Several websites specialize in selling downloadable blueprints. While these aren't free, they often offer a wide variety of plans at reasonable prices, usually ranging from a few dollars to around $20. These sites often provide detailed instructions, material lists, and even 3D models, making the building process much smoother.
Pros: Often more detailed and professional than free plans.
Cons: Require a small investment.
Modifying Existing Plans
Don't be afraid to get creative! If you find a plan that's close to what you want but needs some tweaking, don't hesitate to modify it. Perhaps you need to adjust the dimensions or change the door placement. If you have basic woodworking knowledge, simple modifications are usually doable.
Caution: Make sure any changes you make maintain the structural integrity of the shed.
Essential Considerations Before You Start
Before you even think about hammering a nail, there are a few crucial things to consider:
Local Building Codes and Permits
This is incredibly important! Check with your local authorities to see if you need a permit to build a lean-to shed. Building codes vary, and neglecting this step can lead to fines or even demolition. You might be surprised â€" sometimes smaller sheds are exempt from permits, but it’s crucial to know for sure.
Site Selection
Where will your lean-to be attached? Choose a location that’s level, provides adequate access, and doesn’t interfere with utilities or drainage. Also, consider the prevailing winds and sun exposure â€" you might want to position it to minimize sun damage to the contents or to take advantage of natural light.
Materials
This is where you can really save money! Consider using reclaimed or recycled materials whenever possible. Check local salvage yards or even ask friends and family if they have any leftover lumber they'd be willing to part with. You'll be surprised how much you can save this way!
Building Your Lean-To Shed: A General Overview
The actual construction will depend on your chosen blueprints, but here's a general idea of what to expect:
- Foundation: A simple gravel base or concrete slab is usually sufficient for a small lean-to.
- Framing: This involves building the frame of the shed, including the walls, roof supports, and any internal framing you might need.
- Sheathing: Covering the frame with plywood or other suitable sheathing material provides the structure's outer layer.
- Roofing: Choose an affordable roofing material that suits your climate. Asphalt shingles are a common and relatively inexpensive choice.
- Siding: Add siding to the exterior walls for weather protection and aesthetics.
- Door and Window Installation: If your plans include a door and/or windows, this is the time to install them.
- Finishing Touches: Add trim, paint or stain, and any other final details.
Commonly Asked Questions
Let’s tackle some frequent questions about building affordable lean-to sheds:
Q: How long does it take to build a lean-to shed?
A: This varies greatly depending on size, complexity, and your experience. A simple shed could take a weekend, while a more elaborate one might take several.
Q: What tools do I need?
A: Basic hand tools (hammer, saw, level, measuring tape) are a good starting point. You might also need power tools like a drill, circular saw, and possibly a nail gun for efficiency.
Q: Can I build a lean-to shed by myself?
A: It's possible for smaller, simpler designs, but having a helper is often recommended, especially for lifting heavy materials and ensuring stability.
Q: What if I don't have any woodworking experience?
A: Start with a simple design and take your time. There are tons of online resources, videos, and tutorials available to guide you through each step. Don’t be afraid to ask for help from more experienced DIYers!
Q: How much will it cost?
A: The cost depends heavily on materials and size. A small, simple lean-to could be built for a few hundred dollars, while a larger, more complex one might cost more.
Building your own lean-to shed is a rewarding project! Remember to prioritize safety, plan carefully, and enjoy the process. Happy building!
Monday, January 20, 2025
How to build a shed with a loft for beginners
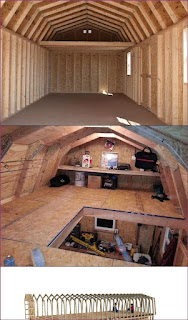
Building Your Dream Shed: A Beginner's Guide to Adding a Loft
Ever dreamed of a stylish, functional shed that maximizes space? This guide walks you through building a shed with a loft, perfect for storing seasonal items, gardening tools, or even creating a cozy workspace. Don't be intimidated â€" with careful planning and these step-by-step instructions, you can accomplish this rewarding project!
Planning Your Shed and Loft
Before you even touch a tool, meticulously plan your shed. Consider the size â€" bigger isn't always better, especially for beginners. A 8ft x 10ft shed offers ample space for tools and a reasonable-sized loft. Sketch your design, noting dimensions and features. Determine the location â€" ensure you have proper access and comply with any local building codes. Think about the door placement and window locations for optimal ventilation and light. Decide on your materials â€" pressure-treated lumber is ideal for its durability and resistance to rot. Remember to factor in the extra materials needed for the loft structure.
Essential Materials List
Gather all your materials beforehand to streamline the process. This list provides a general overview; adjust it based on your specific design and dimensions:
- Pressure-treated lumber (various sizes for framing, floor joists, and loft supports)
- Plywood or OSB for sheathing (roof, walls, and floor)
- Roofing materials (shingles, felt paper)
- Siding (vinyl, wood, metal)
- Doors and windows
- Fasteners (nails, screws)
- Concrete mix for the foundation (or pre-made blocks)
- Loft framing lumber
- Loft flooring material
- Safety equipment (safety glasses, work gloves, hearing protection)
Constructing the Shed Base and Frame
Begin by preparing a level foundation. A concrete slab is ideal, but you can use concrete blocks for a simpler, less expensive option. Once the base is set, erect the shed's main frame. This involves creating the perimeter walls using pressure-treated lumber. Ensure the walls are plumb and square using a level and speed square for accuracy. This forms the skeleton of your shed, which will hold all the other elements. Remember to build the framing with appropriate spacing for insulation and sheathing later in the process.
Adding the Floor
After erecting the walls, install the floor joists, ensuring they are properly spaced and leveled. Next, attach the plywood or OSB sheathing to create a sturdy and even floor. Consider using a vapor barrier underneath the sheathing to protect against moisture damage.
Building the Loft Structure
Once your shed's shell is complete, you can begin the loft construction. This involves adding support beams from the shed's main frame up to the desired loft height. These beams will hold the loft floor. Build a sturdy framework for the loft, ensuring it's securely attached to the main structure for stability. This is where precise measurements and careful assembly are crucial. Don't underestimate the importance of strong support beams; your safety depends on a robust loft structure.
Finishing the Loft
Once the loft frame is built, install the loft flooring (plywood is a great option). This creates a usable space for storage. You may want to add a small ladder or staircase for access. Consider adding a railing for safety if the loft height is significant.
Completing the Shed Exterior
After framing the loft, complete the exterior of the shed. Install the roof sheathing, followed by the roofing materials. Then, add the siding to protect the structure from the elements. Don't forget to install doors and windows at this stage. Choose materials that complement your house's style and maintain a visually appealing structure. A well-finished exterior adds to the shed's overall appeal.
Finishing Touches and Safety Considerations
After completing the exterior, add any finishing touches, like painting or staining the shed and adding trim. Remember safety! Always wear appropriate personal protective equipment (PPE), such as safety glasses, work gloves, and hearing protection. Take breaks when needed, and don't rush the process. Building your own shed with a loft is a rewarding project that will enhance your property for years to come. Enjoy the process!
Step-by-step guide to garden shed construction

A Comprehensive Guide to Garden Shed Construction
Constructing a garden shed is a rewarding project that allows for the customization of storage space and enhances the aesthetic appeal of your property. This guide provides a detailed, step-by-step approach to building a robust and durable garden shed, emphasizing safety and best practices throughout the process. Remember to always consult local building codes and obtain necessary permits before commencing construction.
Phase 1: Planning and Preparation
Site Selection and Assessment
The initial step involves meticulous site selection. Consider factors such as:
- Accessibility: Ensure easy access for material delivery and future maintenance.
- Sunlight and Shade: Balanced sunlight and shade prevent excessive heat buildup or dampness.
- Drainage: Choose a level location with good drainage to avoid water accumulation.
- Ground Conditions: Assess soil type to determine the appropriate foundation.
- Proximity to Utilities: Avoid proximity to underground utilities such as gas lines and electrical cables.
Once the site is chosen, conduct a thorough survey to determine precise dimensions and mark the boundaries of the shed’s footprint. This will serve as the foundation for accurate construction.
Design and Material Selection
The shed’s design should align with your storage needs and aesthetic preferences. Factors to consider include:
- Size and Dimensions: Determine the optimal size based on intended storage capacity.
- Style: Choose a style that complements your existing landscaping and home architecture.
- Materials: Select durable and weather-resistant materials such as pressure-treated lumber, plywood, or composite materials. Consider the longevity and maintenance requirements of each option.
- Door and Window Placement: Strategically place doors and windows for optimal access and ventilation. Prioritize security features like strong locks.
Create detailed blueprints or utilize pre-fabricated shed kits to ensure accurate measurements and material quantities. A well-defined plan minimizes errors and reduces construction time.
Obtaining Necessary Permits and Materials
Contact your local building department to inquire about necessary permits and regulations. This may involve submitting plans for review and obtaining approvals before commencing construction. Delays caused by permit issues can significantly impact the project timeline, so this step should not be overlooked.
After obtaining the necessary permits, procure all building materials. It’s advisable to purchase materials with a slight surplus to account for potential errors or damages. Organize materials systematically for efficient access during the construction process.
Phase 2: Foundation Construction
Site Preparation
Clear the designated area of any vegetation, debris, and rocks. Level the ground using a rake and shovel to create a firm and even base. For uneven terrain, consider using compacted gravel to achieve a level surface. The foundation's stability is paramount for the overall integrity of the shed.
Foundation Type Selection and Construction
The choice of foundation depends on the soil conditions and the weight of the shed. Common options include:
- Concrete Slab: Provides a robust and level base, ideal for heavier sheds and challenging soil conditions. Requires pouring concrete and allowing sufficient curing time.
- Gravel Base: A simpler and less expensive option suitable for lighter sheds and well-drained soil. Involves compacting a layer of gravel to create a level base.
- Concrete Pier Blocks: Provides support at specific points, suitable for sheds on sloped terrain. Requires precise placement of concrete blocks for a level structure.
Once the chosen foundation is complete, ensure it is level and adequately compacted or cured before proceeding to the next stage.
Phase 3: Shed Frame Construction
Framing the Floor
Construct the floor frame using pressure-treated lumber. Ensure proper spacing and fastening of the joists to provide a strong and level base for the shed’s structure. Consider using joist hangers for added strength and stability. The floor frame must be accurately aligned with the foundation to prevent future structural issues.
Wall Framing
Erect the wall frames according to your blueprints. Use appropriate sized lumber for studs and ensure proper bracing to maintain squareness and stability. Check for plumbness frequently using a level to prevent structural deformities. Correct any deviations promptly to maintain the integrity of the shed's frame.
Roof Framing
Construct the roof frame using the appropriate rafter design based on the shed’s style and local building codes. Ensure proper overhangs for protection from the elements. Adequate bracing is crucial for supporting the roof's weight and resisting wind loads. Securely fasten all joints to withstand various weather conditions.
Phase 4: Sheathing and Roofing
Exterior Sheathing
Apply exterior sheathing to the walls and roof frame. Use plywood or OSB (Oriented Strand Board) that is appropriate for exterior applications. Ensure proper overlap and fastening to prevent water penetration and maintain structural integrity. Pay attention to proper sealing around windows and doors.
Roofing
Install the chosen roofing material according to the manufacturer’s instructions. Common options include asphalt shingles, metal roofing, or other durable materials. Proper underlayment is essential for waterproofing and protection against leaks. Ensure proper ventilation to prevent moisture buildup.
Siding and Trim
Apply the chosen siding material to the exterior walls. This could include vinyl, wood, or metal siding. Add trim to enhance the aesthetic appeal and protect the edges of the siding. Proper caulking and sealing are critical to preventing water damage.
Phase 5: Finishing and Interior Work
Door and Window Installation
Install doors and windows carefully, ensuring proper sealing and weather stripping to prevent drafts and water penetration. Use appropriate hardware for security and ease of use. Proper installation is critical for the shed's weather resistance and security.
Interior Finishing
Complete the interior finishing according to your preferences. This may include painting, installing shelving, or adding electrical wiring (ensure adherence to electrical codes). Consider adding insulation for temperature regulation and reducing energy costs.
Final Touches and Clean-Up
Conduct a final inspection to identify and address any imperfections. Perform a thorough cleaning of the site, removing debris and waste materials. A final coat of sealant or paint can add to the shed's longevity and curb appeal. Proper documentation of the construction process is also beneficial for future maintenance or insurance claims.
By diligently following these steps and maintaining a focus on safety and precision, you can successfully construct a durable and functional garden shed that enhances your property for years to come. Remember to always prioritize safety and consult professional advice when needed.
Practical shed with loft ideas for beginners
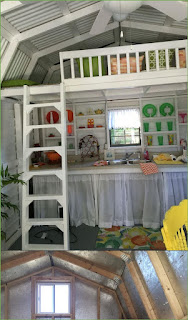
Practical Shed with Loft Ideas for Beginners: A Comprehensive Guide
The construction of a shed, particularly one incorporating a loft, presents a rewarding DIY project for enthusiastic beginners. This guide provides a detailed overview of the planning, design, and construction phases, emphasizing practical considerations and simplifying the process for those with limited experience. Successful completion requires careful preparation, attention to detail, and a commitment to safety throughout the project.
Phase 1: Planning and Design Considerations
Before commencing any construction, meticulous planning is crucial. This phase involves defining the shed's purpose, determining its dimensions, choosing appropriate materials, and obtaining necessary permits.
Defining the Shed's Purpose and Functionality
The intended use of the shed will significantly influence its design and features. A shed for storing gardening equipment will have different requirements than one used as a workshop or hobby space. Consider the following:
- Storage Capacity: Estimate the volume of items to be stored. This will directly impact the shed's internal dimensions, particularly the floor area and loft space.
- Workshop Functionality: If a workshop is planned, factor in workbench space, power outlets, and adequate lighting.
- Loft Usage: Determine whether the loft will serve as additional storage or a more specialized area. This impacts loft access design and structural requirements.
- Access and Accessibility: Plan for easy access to the shed and, importantly, the loft. Consider the height and steepness of any loft ladder or stairs.
Determining Dimensions and Site Selection
Selecting appropriate dimensions is vital. Consider the available space on your property and local building regulations. Ensure sufficient space around the shed for access and future maintenance. The chosen site should be level and well-drained to avoid foundation issues. Factors like sunlight exposure and proximity to utilities should also be carefully considered.
Material Selection and Budgeting
The choice of materials significantly influences both the cost and the longevity of the shed. Common materials include pressure-treated timber, composite materials, and metal. Each has advantages and disadvantages in terms of cost, durability, maintenance, and aesthetic appeal. Creating a detailed budget encompassing all materials, tools, and potential labor costs is essential to avoid unexpected expenses.
Obtaining Necessary Permits and Approvals
Before commencing construction, ascertain whether building permits are required in your area. Contact your local council or planning authority to determine the necessary paperwork and regulations. Non-compliance can result in significant penalties and potential demolition.
Phase 2: Foundation and Frame Construction
A robust foundation is essential for a stable and long-lasting shed. The chosen foundation type will depend on soil conditions and the shed's overall weight. The frame provides the structural integrity for both the shed and the loft.
Foundation Construction: Concrete Slab or Timber Base?
Two common foundation types are concrete slabs and timber bases. Concrete slabs offer superior stability and durability but require more labor and expertise. Timber bases, typically constructed using pressure-treated timber, are a simpler and more cost-effective alternative, suitable for lighter sheds. Proper drainage around the foundation is crucial to prevent water damage.
Framing the Shed Walls and Roof
Accurate framing is paramount for a structurally sound shed. Use pressure-treated timber for framing members to resist rot and insect infestation. Ensure all joints are properly secured using appropriate fasteners. Precise measurements and level construction are crucial to avoid future problems. Consider using pre-fabricated wall panels to simplify the process.
Constructing the Loft Frame
The loft frame should be integrated with the main shed frame, ensuring adequate support and stability. The loft floor joists should be strong enough to support the anticipated weight. Consider using engineered wood products for increased strength and reduced weight. Proper bracing is necessary to prevent sagging and deflection.
Phase 3: Cladding, Roofing, and Loft Access
This phase involves adding the external cladding, roofing material, and creating safe and convenient access to the loft.
Cladding the Shed Walls
Cladding provides weather protection and enhances the shed's aesthetic appeal. Common cladding materials include shiplap, cladding boards, and vinyl siding. Ensure proper overlap and sealing to prevent water ingress. Consider using weatherproof paint or sealant for added protection.
Roofing the Shed
The roofing material should be durable, weather-resistant, and suitable for the local climate. Common options include asphalt shingles, corrugated metal sheets, and felt roofing. Proper flashing and sealing around chimneys and vents are crucial to prevent leaks. Ensure the roof is adequately sloped to facilitate water runoff.
Creating Loft Access: Ladders, Stairs, or Trapdoors?
Choosing the appropriate loft access method depends on the loft's size and intended use. Folding ladders are cost-effective for smaller lofts, while fixed stairs provide easier access but require more space. Trapdoors offer a space-saving solution but can be less convenient. Safety should be paramount â€" ensure the chosen access method is robust and secure.
Phase 4: Internal Finishing and Safety Considerations
The final phase involves completing the interior, ensuring safety features are in place, and conducting a thorough inspection before use.
Interior Finishing: Walls, Flooring, and Insulation
Interior finishing enhances the shed's functionality and aesthetic appeal. Options include plasterboard, plywood, or tongue-and-groove paneling. Consider insulating the walls and ceiling to improve thermal comfort and reduce energy consumption. Choose a suitable flooring material â€" options range from simple concrete to more sophisticated wood or composite flooring.
Electrical Work and Safety
If electrical work is required, it is essential to engage a qualified electrician. Ensure all wiring complies with local electrical codes and regulations. Adequate lighting and power outlets are crucial for safety and functionality. Consider incorporating GFCI (Ground Fault Circuit Interrupter) outlets to minimize the risk of electrical shock.
Final Inspection and Maintenance
Before using the shed, conduct a thorough inspection to ensure all components are securely fastened and functioning correctly. Regular maintenance, including checking for structural damage, water leaks, and pest infestations, is essential to prolong the shed's lifespan. A well-maintained shed will provide years of reliable service.
By following these steps and exercising caution throughout the project, beginners can successfully construct a practical and functional shed with a loft, adding valuable storage and workspace to their property.
Beginner-friendly loft shed project inspiration

Building Your Dream Loft Shed: A Beginner's Guide
Hey there, fellow DIY enthusiasts! So, you're thinking about building a loft shed? Awesome! It's a fantastic project that combines practicality with a touch of that satisfying "I built this myself!" feeling. This guide is designed for beginners, so don't worry if you're more familiar with a screwdriver than a saw. We’ll walk through the whole process, step by step. Let's get started!Why a Loft Shed?
Before we dive into the nitty-gritty, let's talk about why a loft shed is such a great idea. Think about it: you get a ton of extra storage space, all neatly organized, plus a bonus loft area perfect for all sorts of things!
Here are some of the amazing benefits:
- Increased Storage: Obvious, right? But seriously, the amount of stuff you can stash away in a loft shed is incredible. Garden tools, sports equipment, holiday decorations â€" it all has a place.
- Organized Space: No more cluttered garages or overflowing sheds. A well-designed loft shed helps you keep everything tidy and easily accessible.
- Versatile Loft Area: This is where things get exciting! Use your loft for seasonal storage, a workshop, a quiet reading nook, or even a small potting station (depending on its size and your ambitiousness!).
- Added Value to Your Property: A well-built shed is a great addition to your property, potentially increasing its value.
- Sense of Accomplishment: Let's be honest, there’s a huge sense of pride in building something with your own two hands.
Planning Your Loft Shed Project
Now for the fun part â€" planning! This stage is crucial to avoid headaches later on. Don't skip it!
Choosing the Right Location
Consider the following:
- Accessibility: Will you need easy access for vehicles? Is it close enough to your house to be convenient but far enough to be out of sight?
- Sunlight and Shade: Too much sun might damage stored items, too little might create a damp environment. Aim for a balance.
- Ground Conditions: Is the ground level and stable? You'll likely need a level base for your shed.
- Local Regulations: Check your local council or homeowner's association rules regarding shed size and placement.
Size and Dimensions
How big do you need your shed to be? This depends entirely on your storage needs. Sketch out a rough plan, considering both the ground floor and loft space. You might want to use graph paper to help visualise everything.
Materials
Choosing the right materials is essential for longevity and weather resistance. Popular choices include:
- Pressure-treated lumber: This is resistant to rot and insects, making it ideal for outdoor use.
- Metal siding: Low maintenance and durable, but can get very hot in direct sunlight.
- Vinyl siding: Another low-maintenance option, offering a variety of styles and colors.
Tools and Equipment
Gather your tools beforehand! You'll likely need:
- Measuring tape
- Level
- Saw (circular saw or hand saw)
- Drill
- Screwdriver (or impact driver)
- Hammer
- Shovel
- Post hole digger (if you're building a more substantial shed)
- Safety glasses and gloves
Consider renting some tools if you don't own them all. It's often cheaper than buying them if you're only doing one project.
Construction: A Step-by-Step Guide (Simplified)
This is a simplified overview. Detailed plans can be found online or in books, tailored to your specific design.
Foundation
Begin with a level base. This could be a concrete slab, compacted gravel, or even treated lumber placed on level ground. The sturdiness of your foundation is crucial for the entire structure's stability.
Framing the Walls and Floor
Construct the walls using your chosen lumber, ensuring they are square and plumb (perfectly vertical). The floor should be strong enough to support the weight of your stored items and the loft structure above.
Building the Loft
This is where your creativity comes in! The loft will likely involve building support beams and joists. Make sure the loft structure is secure and adequately supported to hold whatever you plan to store up there.
Roofing
Choose a roofing material suitable for your climate. Consider asphalt shingles, metal roofing, or even corrugated plastic sheeting (depending on your budget and preference).
Siding and Finishing Touches
Install your chosen siding, add doors and windows, and give your shed a final coat of paint or sealant to protect it from the elements.
Tips for Beginners
- Start small: Don't feel pressured to build a massive shed on your first attempt. A smaller project is less overwhelming.
- Take your time: Quality over speed! Rushing can lead to mistakes.
- Ask for help: Don't be afraid to ask for assistance from friends, family, or experienced DIYers.
- Read instructions carefully: Before you begin any step, make sure you fully understand the instructions.
- Double-check measurements: Accuracy is key in construction. Measure twice, cut once!
- Prioritize safety: Always wear safety glasses and gloves, and use appropriate safety equipment for any power tools.
Frequently Asked Questions
Q: How much does it cost to build a loft shed?
A: The cost varies greatly depending on size, materials, and your DIY skills. Expect to spend anywhere from a few hundred to several thousand dollars.
Q: How long does it take to build a loft shed?
A: This also depends on the size and complexity, as well as your experience. A smaller, simpler shed might take a weekend, while a larger one could take several weeks or even months.
Q: Do I need a building permit?
A: Check with your local authorities. Building permits are often required for structures above a certain size.
Q: What about insulation?
A: Insulating your shed, especially the loft area, can make it more comfortable to use, particularly in extreme weather conditions. This depends on your climate and intended use.
Q: Can I build a loft shed myself, even as a beginner?
A: Absolutely! This guide and many others online provide a wealth of information and support for beginners. Start with a manageable project, and don't be afraid to learn as you go.
Happy building!
How to construct a loft in your DIY shed

Building a Loft in Your DIY Shed: A Step-by-Step Guide
So, you've got a trusty DIY shed, but it's feeling a little cramped? You're not alone! Many shed owners find themselves wishing for extra storage space. The solution? A loft! Building a loft in your shed is a fantastic way to maximize your storage, and while it might seem daunting, it's totally doable with a bit of planning and elbow grease. This guide will walk you through the entire process, from initial planning to the final touches, so grab your tools and let's get started!
Phase 1: Planning and Preparation
Before you even think about grabbing a hammer, careful planning is key. This phase is all about ensuring your project is safe, structurally sound, and meets your needs.
Assessing Your Shed's Structure
The first step is to thoroughly examine your shed's existing structure. Is it sturdy enough to support the extra weight of a loft? Look for any signs of rot, warping, or instability. If your shed is in poor condition, you might need to do some repairs before proceeding. Consider the overall height of your shed; you'll need sufficient headroom to access the loft comfortably. Measure the dimensions carefully to determine the size and layout of your loft.
Choosing Your Materials
The materials you choose will significantly impact the strength, longevity, and overall cost of your loft. Pressure-treated lumber is a great option for its resistance to rot and decay, especially important in a shed environment. You'll also need screws, nails, possibly some brackets or supports, and appropriate safety equipment.
Don't skimp on the quality of your lumber. Using cheap, flimsy wood can compromise the structural integrity of your loft and even lead to accidents down the road. For the flooring, consider using plywood sheets â€" they're relatively inexpensive, easy to work with, and provide a solid surface.
Designing Your Loft
Sketch out a basic design before you start building. Consider:
- The size and shape of the loft: How much storage space do you need?
- Access: How will you get to the loft? Will you use a ladder, a staircase, or a pull-down ladder?
- Support structure: How will you support the loft floor? This often involves building supporting beams or walls.
- Weight Capacity: Determine how much weight the loft will need to support and design accordingly.
Phase 2: Construction
Now for the fun part! Remember safety first; always wear appropriate safety gear, including gloves and eye protection.
Building the Support Structure
This is the most crucial part of the process. The strength of your loft depends entirely on the stability of its supports. You'll likely need to install beams across the existing shed structure to provide a solid base for the floor. The exact method will depend on your shed's design and the size of your loft. You might need to add additional vertical supports, too.
Consider using strong connectors and fasteners to ensure everything is securely attached. This is not the time to be shy with screws or nails!
Constructing the Loft Floor
Once your support structure is in place, it's time to lay the floor. Use plywood sheets, ensuring they are securely fastened to the support beams. For added strength and to prevent squeaking, use construction adhesive along with screws to attach the plywood.
Make sure the plywood sheets are properly aligned and leave a small gap between each sheet for expansion and contraction due to changes in temperature and humidity.
Adding Access
How you choose to access your loft will depend on your design and personal preference. A simple pull-down ladder is a cost-effective and space-saving option. For easier access, a small staircase might be preferable, though this will take up more floor space in your shed.
Phase 3: Finishing Touches
With the main structure complete, it’s time to add the finishing touches. This will make your new loft look great and help protect it from the elements.
Protecting the Wood
Apply a wood sealant or stain to protect your loft from moisture and the elements. This will help to extend the lifespan of your loft and keep it looking its best. Choose a sealant that’s suitable for exterior use, especially if your shed isn’t fully enclosed.
Adding Storage Solutions
Now you can really start to enjoy your new loft space! Consider adding shelves, bins, or other storage solutions to maximize its capacity. This will help keep your belongings organized and easily accessible.
Frequently Asked Questions
Here are some commonly asked questions about building a loft in a DIY shed:
Q: Do I need planning permission?
A: In most cases, you won't need planning permission to build a loft in your shed, provided it doesn't significantly alter the external appearance of the shed or exceed certain size restrictions. However, it’s always best to check with your local council to be sure.
Q: How much does it cost?
A: The cost will vary depending on the size of your loft, the materials you choose, and your DIY skills. You can expect to spend anywhere from a few hundred dollars to a few thousand, depending on the project's complexity.
Q: Can I do this myself?
A: Absolutely! With careful planning and attention to detail, most DIY enthusiasts can build a shed loft. However, if you're uncomfortable with any aspect of the construction, it’s always best to seek professional help.
Q: What if my shed isn't level?
A: An unlevel shed will make the loft construction more challenging. You may need to level the shed floor before starting the project, or account for the unevenness in your support structure. Consider shims or adjustable supports to compensate for the unevenness.
Q: How do I ensure the loft is structurally sound?
A: Use high-quality materials, follow building codes and best practices, and make sure your support structure is strong enough to handle the expected weight. Don't hesitate to consult with a professional if you have any doubts about the structural integrity of your design.
Building a loft in your shed is a rewarding project that significantly increases your storage space. By following these steps and prioritizing safety, you can transform your shed into a more organized and functional space. Happy building!