Friday, January 24, 2025
How to Use Wood Pallets to Build a Shed That’s Customizable and Affordable
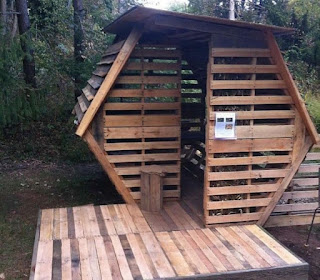
Build Your Dream Shed: A Customizable and Affordable Pallet Project
Tired of overflowing garages and cluttered yards? Dreaming of a dedicated workshop, storage space, or even a charming garden shed, but dreading the high cost of traditional construction? Then look no further! This guide shows you how to transform reclaimed wood pallets into a sturdy, customizable, and remarkably affordable shed. Forget expensive lumber and complicated plans; with a little ingenuity and elbow grease, you can build the perfect shed to suit your needs and budget.

Planning Your Pallet Shed: Size, Location, and Design
Before you dive into the world of pallet repurposing, careful planning is crucial. First, determine the ideal size for your shed. Consider the items you plan to store and allow for comfortable maneuvering inside. Next, choose a suitable location on your property. Ensure the ground is level and that you have adequate access for construction and future use. Finally, sketch a basic design. While pallets lend themselves to rustic aesthetics, consider the overall style you desire. Do you envision a simple, functional structure or something more elaborate? Remember to account for doors, windows, and a sturdy roof.
Assessing Your Pallet Resources
Source your pallets responsibly! Check with local businesses like construction sites, breweries, or shipping companies. Inspect each pallet carefully; select strong, undamaged pallets free from rot, pest infestation, and loose nails. You’ll need a significant quantity; the exact number will depend on your shed's dimensions. Remember to prioritize safety; wear gloves and protective eyewear when handling pallets.
Construction: A Step-by-Step Guide
Now for the exciting part â€" building your shed! This process requires patience and attention to detail, but the rewards are well worth the effort. Begin by creating a solid foundation. A concrete slab is ideal but not mandatory; a well-prepared gravel base will suffice for lighter sheds. Construct the floor using additional pallets or strong plywood. Then, assemble the walls, carefully attaching the pallets using screws and appropriate joinery techniques for extra strength. Remember to reinforce corners for maximum stability.
Roofing and Finishing Touches
The roof is a critical element of your shed's structural integrity. Consider a simple gable or shed roof design, easily achievable with additional pallets or affordable roofing materials like plywood covered with waterproof sheeting. Don't forget to add proper ventilation to prevent moisture buildup. Once the structure is complete, sand down any rough edges, and apply a weather-resistant sealant or paint to protect the wood and enhance its appearance. Finally, install your doors and windows; this is where you can add your personal touches and create a truly unique shed.
Customizing Your Pallet Shed
The beauty of building a pallet shed is its inherent customizability. Beyond the basic structure, you can personalize it in countless ways. Incorporate reclaimed materials like metal sheets for siding, or add unique window boxes for a charming touch. Use different paint colors to create stripes or patterns. Consider adding shelves, hooks, or workbenches inside to maximize storage and functionality. The possibilities are as limitless as your imagination.
Essential Tools and Materials
Gather your tools and materials beforehand to streamline the process. You'll need:
- Reclaimed wood pallets
- Screws and nails
- Hammer and screwdriver (or drill)
- Measuring tape and level
- Saw (circular saw or hand saw)
- Safety glasses and gloves
- Roofing materials (plywood, waterproof sheeting)
- Weather-resistant sealant or paint
- Doors and windows
Building a shed from reclaimed wood pallets is a rewarding project that blends affordability with creativity. With careful planning, diligent construction, and a dash of personal flair, you can craft a functional and stylish addition to your property â€" a testament to resourceful DIY ingenuity!
No comments:
Post a Comment
Note: Only a member of this blog may post a comment.