Friday, January 24, 2025
Build a lean to shed with easy-to-follow instructions
Building Your Own Lean-To Shed: A Beginner's Guide
Hey there, fellow DIY enthusiast! So you're thinking about building a lean-to shed? Awesome! It's a fantastic project, perfect for beginners, and incredibly rewarding. This guide will walk you through the process, step-by-step, in a way that even *I* can understand (and I'm not exactly known for my handyman skills!). We'll keep it simple, focusing on a basic design that’s easy to modify to suit your needs.

Planning Your Lean-To Shed
Before you even think about touching a saw, let's get the planning sorted. This is the most crucial part, trust me! A little prep work will save you headaches (and maybe even some injuries) down the line.

1. Location, Location, Location!
Where are you going to put this beauty? You’ll need a sturdy wall â€" an existing house wall, a garage, or even a well-built fence â€" to lean it against. Make sure the ground is relatively level and you have enough space for the shed's footprint. Consider sunlight, drainage, and proximity to your house or other structures.
2. Size Matters (But Not Too Much!)
How big do you need it to be? Start small if you're a first-timer. A 6ft x 8ft lean-to is a manageable size for a beginner. Larger sheds require more materials and more advanced building skills.
3. Materials List â€" Get That Shopping List Ready!
Here’s a general list. Remember to adjust the quantities based on your shed’s dimensions. You’ll probably want to get extra wood just in case of any mishaps.
- Pressure-treated lumber for the base and supports (4x4 posts are a good choice for the support posts)
- Pressure-treated lumber for the roof rafters (2x4s are common)
- Plywood for the roof sheathing
- Roofing material (shingles, metal, etc.)
- Concrete blocks or pier supports for the base (optional, but recommended)
- Nails, screws, and a hammer
- Level, measuring tape, saw (circular saw or hand saw), post hole digger (if using pier supports)
- Safety glasses and work gloves (Seriously, wear them!)
Building the Foundation
A solid foundation is key! This is where your lean-to will rest, so make sure it's stable and level.
1. Preparing the Ground
Clear the area of any debris, grass, or rocks. Level the ground as much as possible. You can use a rake and shovel to do this.
2. Setting the Posts
If you're using concrete blocks, place them in a straight line along the wall you’re leaning against. If you’re using pier supports, dig holes and set the pier supports in concrete. Make sure they’re level! A level is your best friend here. This will be the base for your lean-to’s side wall.
3. Building the Base Frame
Now, using your pressure-treated lumber (4x4s are usually perfect), build a rectangular frame for the base of your shed. Make sure the frame is the same length as the wall you're leaning against and the width you chose. Attach it securely to the support posts or concrete blocks. This forms the bottom support for your lean-to’s structure.
Constructing the Frame and Roof
This is where things get a little more involved, but don't worry, we'll take it slow!
1. Erecting the Side Walls
For a basic lean-to, you will only need one side wall (the one that isn’t leaning on another structure). This will typically use 2x4s. You will attach these vertically to the base frame and then add horizontal support pieces to reinforce the structure. Make sure your wall is plumb (perfectly vertical) using your level.
2. Attaching the Rafters
The rafters are the sloping beams that form the roof. Cut your 2x4s to the correct length (this will depend on the height of your shed and the slope of your roof â€" a steeper slope will help with water runoff). Attach them to the top of your side wall and to the wall you're leaning against, creating a sturdy triangular structure.
3. Sheathing the Roof
Once your rafters are in place, it's time to add the plywood sheathing. This creates a solid surface for your roofing material. Make sure the plywood is securely attached to the rafters with nails. Use construction adhesive for extra strength and to prevent squeaks.
Finishing Touches
You're almost there! Just a few more steps to complete your lean-to shed.
1. Installing the Roofing Material
This is where you’ll get to choose your roofing material â€" shingles, metal, etc. Follow the manufacturer's instructions for installation. This can be a bit tricky, but taking your time and focusing on each step will ensure a watertight roof.
2. Adding Doors and Windows (Optional)
If you want a door or windows, now’s the time to install them. You’ll need to frame them properly to ensure a snug fit.
3. Finishing the Interior (Optional)
Once your shed is built, you can add a floor, shelves, or any other interior features you need. This is where you can get creative!
Commonly Asked Questions
Here are some common questions I get about building lean-to sheds:
- Q: Do I need a building permit? A: It depends on your local regulations. Check with your local building department before you start.
- Q: How long does it take to build a lean-to shed? A: A basic lean-to can be built in a weekend, depending on your experience and the size of the shed.
- Q: Can I use untreated lumber? A: I strongly advise against it. Untreated lumber will rot and decay quickly, especially if exposed to the elements.
- Q: What type of roofing material is best? A: Shingles are a popular and relatively inexpensive option. Metal roofing is more durable but can be more expensive.
- Q: How do I make sure the shed is level? A: Use a level constantly throughout the building process. Check your level frequently to ensure walls and the roof are plumb and level. Don't rush!
And there you have it! Building a lean-to shed is a rewarding project that can add valuable space to your property. Remember to prioritize safety, take your time, and enjoy the process. Happy building!
Free lean-to shed designs for creating extra storage in your backyard
Unlock Backyard Bliss: Free Lean-To Shed Designs for Extra Storage
Tired of cluttered garages and overflowing basements? Yearning for a tidy backyard oasis but lacking the funds for a costly shed? Then embrace the practicality and charm of a lean-to shed! These ingenious structures, built against an existing wall (like your house, garage, or fence), maximize space and minimize costs. This article provides you with free lean-to shed designs, empowering you to transform your outdoor space into an organized haven.

Choosing the Perfect Lean-To Location
Before you even think about hammering a nail, carefully consider the ideal location for your lean-to shed. Sunlight is keyâ€"consider the amount of sun exposure the area receives throughout the day. A partially shaded spot will keep your shed cooler in the summer. Assess the ground conditions; a level surface is crucial for a stable structure. Additionally, proximity to power sources, if needed for lighting or future additions, should be taken into account. Finally, think about access. You want a location that’s easily accessible from your house and doesn’t impede pathways or other yard features.

Factors to Consider Before Starting
- Local Building Codes: Check with your local authorities for any regulations or permits required before building your shed.
- Existing Structure Stability: Ensure the wall you're leaning the shed against is structurally sound and can support the added weight.
- Material Availability: Plan your design around materials readily available in your area or from local recycling centers for a more sustainable and budget-friendly approach.
Free Lean-To Shed Designs: Three Options to Explore
We're offering three distinct lean-to shed designs to spark your creativity. Remember, these are starting points; feel free to customize them to match your specific needs and aesthetics.
Design 1: The Simple Garden Shed
This design focuses on functionality and ease of construction. It utilizes readily available materials like pressure-treated lumber and corrugated metal roofing. The basic framework consists of sturdy vertical supports attached to the existing wall, with horizontal beams forming the roofline. The roof is sloped to facilitate water runoff, and the walls are constructed using simple stud framing and plywood sheathing. This design is perfect for storing gardening tools, potting supplies, and seasonal decorations.
Design 2: The Rustic Wood Lean-To
For a more aesthetically pleasing option, consider this rustic design. This lean-to showcases reclaimed wood for a charming, environmentally friendly aesthetic. The design emphasizes natural textures and uses techniques like shiplap siding for walls and reclaimed wood for roofing. The roofline can be more elaborate, incorporating decorative elements like exposed beams or a slightly curved design. This option is ideal for those looking for a more visually appealing storage solution that blends seamlessly with natural surroundings.
Design 3: The Modern Minimalist Lean-To
This design takes a modern approach, prioritizing clean lines and a minimalist aesthetic. It uses sleek materials like composite decking for the base and metal roofing for a contemporary look. The walls can be constructed using simple, vertical siding panels, or left partially open for a more airy feel. This design works well as a stylish outdoor storage solution for bikes, outdoor furniture, or even as a small workshop space. This design emphasizes functionality without sacrificing style.
Getting Started: Tips for Success
Before you begin, create detailed plans and sketches. This will help you visualize the final product and ensure accurate measurements. Gather all your tools and materials before starting. Consider working with a friend or family member for assistance, making the building process smoother and more enjoyable. Remember to prioritize safety throughout the entire process, using appropriate safety gear such as gloves and safety glasses.
Building a lean-to shed is a rewarding experience that combines creativity, practicality, and cost-effectiveness. With careful planning and these free designs as your guide, you can easily transform your backyard into a beautifully organized space. So grab your tools and let's build!
DIY lean to shed designs for backyard simplicity
DIY Lean-To Shed Designs for Backyard Simplicity
The allure of a backyard shed, a space for storage, gardening equipment, or even a quiet retreat, is undeniable. However, the cost and complexity of professionally built sheds can be prohibitive. A lean-to shed, with its simple design and straightforward construction, offers an attractive alternative for the DIY enthusiast. This guide explores various lean-to shed designs, focusing on simplicity and ease of construction, enabling homeowners to create functional and aesthetically pleasing additions to their properties.

Understanding the Lean-To Shed Design
Lean-to sheds derive their name from their design: a single sloping roof attached to an existing structure, such as a house, garage, or fence. This design minimizes material costs and simplifies the construction process, as only one sloped roof needs to be framed and covered. The simplicity of the lean-to design makes it an ideal project for novice DIYers, requiring only basic carpentry skills and readily available materials.

Advantages of a Lean-To Shed
The advantages of choosing a lean-to shed are numerous:
- Cost-Effective: Requiring less material than a free-standing shed, lean-tos significantly reduce construction costs.
- Easy Construction: The simple design minimizes complexity, making it a manageable project for DIYers of all skill levels.
- Space-Saving: Lean-tos utilize existing structures, maximizing available space in smaller backyards.
- Aesthetic Integration: When appropriately designed, lean-tos can complement the existing architecture of the property.
- Versatile Functionality: Lean-tos can serve various purposes, from tool storage to workshops or even covered outdoor seating areas.
Considerations Before Construction
Before embarking on the project, careful planning is crucial. Several key considerations must be addressed:
- Local Building Codes and Permits: Research and adhere to all local building codes and obtain necessary permits. This ensures compliance and prevents potential legal issues.
- Existing Structure Assessment: Evaluate the structural integrity of the structure to which the lean-to will be attached. Ensure it can adequately support the added weight.
- Site Selection: Choose a location that is level and accessible, considering drainage and sunlight exposure.
- Size and Dimensions: Determine the desired size and dimensions of the shed, ensuring it aligns with your needs and available space. Consider future expansion possibilities.
- Materials Selection: Select appropriate and durable materials for the framing, roofing, and siding, considering both budget and aesthetics.
DIY Lean-To Shed Design Variations
The versatility of the lean-to design allows for a range of variations, catering to different needs and aesthetic preferences.
The Basic Lean-To
This design features a simple, single-sloped roof supported by a frame constructed from pressure-treated lumber. The sides and back are typically enclosed with plywood or other suitable sheeting, and the roof is covered with asphalt shingles, corrugated metal, or polycarbonate sheets. This is the most straightforward design, ideal for beginners.
The Gable-Ended Lean-To
This variation incorporates a gable end at the free-standing end of the lean-to, creating a more visually appealing and structurally robust design. This adds a slight increase in complexity but enhances the shed's overall appearance and provides more headroom.
The Multi-Purpose Lean-To
By incorporating features such as windows, doors, and shelves, the lean-to can be transformed into a more functional space. Windows allow for natural light and ventilation, while shelves provide organized storage. A door enables easy access to the interior.
The Covered Patio Lean-To
This design focuses on creating a covered outdoor space rather than solely on storage. The roof provides shelter from the elements, while the sides may remain open or partially enclosed with screens or latticework. This option is perfect for outdoor dining or relaxation.
Construction Steps: A General Overview
While specific construction details vary depending on the chosen design and materials, the general steps remain consistent across most lean-to shed projects.
Foundation Preparation
Begin by preparing a level foundation. This could involve laying a concrete slab, gravel base, or using pressure-treated lumber for a raised platform. The foundation must be sturdy and capable of supporting the weight of the shed.
Framing the Structure
Construct the frame using pressure-treated lumber. This involves building the base frame, the supporting posts, and the rafters for the roof. Ensure all connections are secure and properly braced. Accurate measurements and precise cuts are crucial for a stable structure.
Sheathing and Roofing
Once the frame is complete, attach the sheathing to the walls and roof. This provides a solid base for the exterior cladding and roofing material. Install the chosen roofing material, ensuring it is properly sealed and waterproof.
Siding and Finishing
Apply the exterior siding, protecting the structure from the elements. This can be plywood, vinyl, metal, or other suitable materials. Finally, complete any finishing touches, such as painting, staining, or installing doors and windows.
Material Selection and Cost Considerations
Material selection significantly impacts both the cost and durability of the lean-to shed. Pressure-treated lumber is recommended for the frame due to its resistance to rot and decay. For roofing, asphalt shingles, corrugated metal, or polycarbonate sheets are popular choices, each offering varying levels of durability and cost. Siding options range from plywood and vinyl to more expensive metal or composite materials. Careful budgeting and material selection are key to managing project costs.
Constructing a DIY lean-to shed is a rewarding endeavor, offering a functional and aesthetically pleasing addition to any backyard. By carefully planning, following these guidelines, and selecting appropriate materials, homeowners can create a durable and valuable structure that enhances their property for years to come. Remember always to prioritize safety and adhere to local building codes throughout the construction process.
Free garden shed designs for a compact and organized backyard
Free Garden Shed Designs for a Compact and Organized Backyard
Optimizing limited backyard space necessitates careful consideration of storage solutions. A garden shed, when thoughtfully designed and implemented, can transform a cluttered area into an organized and aesthetically pleasing extension of the home. This article explores several free garden shed designs specifically tailored for compact backyards, focusing on maximizing functionality and minimizing footprint.

Design Principles for Compact Garden Sheds
The key to successfully integrating a garden shed into a small backyard lies in adhering to specific design principles. Prioritizing vertical space, incorporating multi-functional elements, and selecting appropriate materials are crucial considerations. Careful planning will prevent the shed from overwhelming the space, instead enhancing its usability.

Maximizing Vertical Space
In compact settings, vertical space is a premium resource. Vertical storage solutions within the shed are paramount. This can be achieved through the incorporation of tall shelving units, hanging organizers for tools, and loft spaces for less frequently used items. Consider using the full height of the shed's walls, extending shelving to the ceiling to maximize capacity.
Multi-Functional Design
Integrating dual-purpose features increases the shed's practicality. For example, a workbench integrated into one wall can serve as both a workspace and a sturdy surface for storage. Consider incorporating a small potting bench for gardening enthusiasts, or a dedicated area for storing bicycles or outdoor equipment. The design should accommodate the specific needs of the homeowner while retaining a sense of order.
Material Selection for Compact Spaces
The materials chosen significantly influence the shed's visual impact and its functionality within a limited space. Lightweight materials like cedar or treated pine are ideal for smaller sheds as they reduce the overall structural weight. Furthermore, lighter materials allow for greater flexibility in design and placement, minimizing the impact on the overall aesthetic of the backyard.
Free Garden Shed Design Options: A Detailed Exploration
Numerous free garden shed designs are available online, catering to a wide range of tastes and needs. The following sections present detailed descriptions of several suitable options for compact backyards, highlighting their unique features and advantages.
Design 1: The Lean-To Shed
The lean-to shed is an excellent choice for extremely compact spaces. Its simple design, often attached to an existing structure like a house or fence, minimizes its footprint. This design typically features a single sloped roof, lending itself to a streamlined appearance. Advantages include ease of construction, low material costs, and efficient use of space. However, storage capacity is generally limited due to the sloped roofline. Detailed plans can often be found online by searching for "lean-to shed plans".
- Pros: Minimal footprint, low cost, easy to build.
- Cons: Limited storage space, may require existing structure for support.
Design 2: The Gable Shed
The gable shed, featuring two sloped roofs meeting at a ridge, offers more vertical space compared to the lean-to design. This allows for increased storage capacity while maintaining a relatively compact overall footprint. The triangular shape of the gable roof also aids in shedding water effectively. While generally more complex to construct than a lean-to, numerous free plans available online simplify the process. Consider using a smaller gable shed to fit a limited space.
- Pros: More headroom and storage than lean-to, aesthetically pleasing.
- Cons: Slightly more complex to construct than a lean-to.
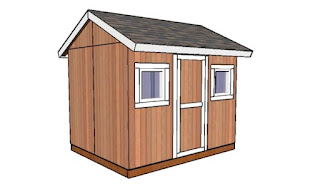
Design 3: The A-Frame Shed
The A-frame shed, characterized by its distinctive triangular shape, presents an exceptionally space-efficient option for smaller backyards. Its compact footprint and vertical orientation maximize storage in a minimal area. While the construction may require a bit more skill compared to other designs, the resulting compact and charming shed makes it a rewarding project. Free plans are readily accessible online, often accompanied by detailed instructions and diagrams.
- Pros: Very compact footprint, maximizes vertical storage.
- Cons: Can be challenging to build for beginners.
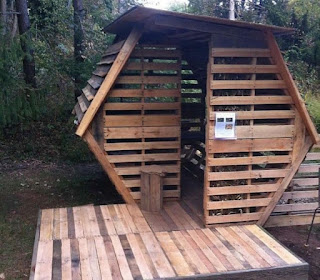
Design 4: The Pallet Shed
For an extremely budget-friendly and eco-conscious option, consider a pallet shed. This unique design utilizes repurposed shipping pallets as the primary building material, significantly reducing construction costs and environmental impact. While requiring some creativity and ingenuity, pallet sheds offer a rustic charm and can be surprisingly spacious for their size. Careful planning is necessary to ensure structural stability. Online resources provide numerous design ideas and tutorials.
- Pros: Extremely cost-effective, eco-friendly, unique aesthetic.
- Cons: Requires creativity and potentially more effort in construction.
Optimizing Shed Placement and Integration
Strategic placement of the garden shed within the compact backyard is critical to its overall success. Consider factors like sunlight exposure, proximity to the house, and visual impact on the surrounding landscape. Blending the shed’s design with the existing backyard aesthetic is crucial to create a cohesive and visually appealing space.
Sun Exposure and Ventilation
Place the shed strategically to maximize natural light and ventilation. Avoid locations that are overly shaded, as this can lead to moisture buildup and potential damage to stored items. Proper ventilation is essential to prevent mold and mildew growth.
Proximity to the House
The shed's proximity to the house should be determined by convenience and accessibility. While close proximity is desirable for ease of access, consider potential impacts on the overall visual balance of the backyard. Avoid obstructing pathways or views.
Aesthetic Integration
Select a shed design and material that complements the existing style of the house and landscape. Consider painting the shed a color that harmonizes with the surroundings. Adding landscaping elements around the shed can further integrate it into the overall backyard design.
By carefully considering these design principles and exploring the free plans readily available online, homeowners can successfully incorporate a functional and aesthetically pleasing garden shed into even the most compact backyard spaces, creating a more organized and enjoyable outdoor environment.
How to Use Wood Pallets to Build a Shed That’s Customizable and Affordable
Build Your Dream Shed: A Customizable and Affordable Pallet Project
Tired of overflowing garages and cluttered yards? Dreaming of a dedicated workshop, storage space, or even a charming garden shed, but dreading the high cost of traditional construction? Then look no further! This guide shows you how to transform reclaimed wood pallets into a sturdy, customizable, and remarkably affordable shed. Forget expensive lumber and complicated plans; with a little ingenuity and elbow grease, you can build the perfect shed to suit your needs and budget.

Planning Your Pallet Shed: Size, Location, and Design
Before you dive into the world of pallet repurposing, careful planning is crucial. First, determine the ideal size for your shed. Consider the items you plan to store and allow for comfortable maneuvering inside. Next, choose a suitable location on your property. Ensure the ground is level and that you have adequate access for construction and future use. Finally, sketch a basic design. While pallets lend themselves to rustic aesthetics, consider the overall style you desire. Do you envision a simple, functional structure or something more elaborate? Remember to account for doors, windows, and a sturdy roof.
Assessing Your Pallet Resources
Source your pallets responsibly! Check with local businesses like construction sites, breweries, or shipping companies. Inspect each pallet carefully; select strong, undamaged pallets free from rot, pest infestation, and loose nails. You’ll need a significant quantity; the exact number will depend on your shed's dimensions. Remember to prioritize safety; wear gloves and protective eyewear when handling pallets.
Construction: A Step-by-Step Guide
Now for the exciting part â€" building your shed! This process requires patience and attention to detail, but the rewards are well worth the effort. Begin by creating a solid foundation. A concrete slab is ideal but not mandatory; a well-prepared gravel base will suffice for lighter sheds. Construct the floor using additional pallets or strong plywood. Then, assemble the walls, carefully attaching the pallets using screws and appropriate joinery techniques for extra strength. Remember to reinforce corners for maximum stability.
Roofing and Finishing Touches
The roof is a critical element of your shed's structural integrity. Consider a simple gable or shed roof design, easily achievable with additional pallets or affordable roofing materials like plywood covered with waterproof sheeting. Don't forget to add proper ventilation to prevent moisture buildup. Once the structure is complete, sand down any rough edges, and apply a weather-resistant sealant or paint to protect the wood and enhance its appearance. Finally, install your doors and windows; this is where you can add your personal touches and create a truly unique shed.
Customizing Your Pallet Shed
The beauty of building a pallet shed is its inherent customizability. Beyond the basic structure, you can personalize it in countless ways. Incorporate reclaimed materials like metal sheets for siding, or add unique window boxes for a charming touch. Use different paint colors to create stripes or patterns. Consider adding shelves, hooks, or workbenches inside to maximize storage and functionality. The possibilities are as limitless as your imagination.
Essential Tools and Materials
Gather your tools and materials beforehand to streamline the process. You'll need:
- Reclaimed wood pallets
- Screws and nails
- Hammer and screwdriver (or drill)
- Measuring tape and level
- Saw (circular saw or hand saw)
- Safety glasses and gloves
- Roofing materials (plywood, waterproof sheeting)
- Weather-resistant sealant or paint
- Doors and windows
Building a shed from reclaimed wood pallets is a rewarding project that blends affordability with creativity. With careful planning, diligent construction, and a dash of personal flair, you can craft a functional and stylish addition to your property â€" a testament to resourceful DIY ingenuity!
How to plan a durable shed project
Building a Fortress: Planning Your Indestructible Shed
Dreams of a sturdy, long-lasting shed often meet the harsh reality of shoddy construction. Don't let your vision crumble! This guide empowers you to plan a shed that will withstand the test of time, protecting your precious belongings from the elements and the inevitable wear and tear of daily life. We'll walk you through every crucial step, ensuring your shed becomes a testament to meticulous planning and robust execution.

1. Laying the Foundation: Site Selection and Design
Before you even think about hammering a nail, meticulously choose your shed's location. Consider factors like sunlight exposure (for proper ventilation and dryness), proximity to utilities (water and electricity, if needed), and the overall drainage of your land. Poor drainage can lead to foundation problems and premature rotting. Analyze the ground’s composition; rocky soil may require extra excavation, while soft soil necessitates a more substantial foundation. Next, design your shed. Sketch your ideal dimensions, considering both the storage space you need and the overall aesthetic you want to achieve. This process is vital; a well-thought-out design translates to a stronger, more functional shed.

A. Groundwork is Key
Assess your land thoroughly. Proper drainage is paramount. Consider installing a gravel base or French drain if necessary. This prevents water accumulation around the shed's foundation, minimizing the risk of rot and instability. Also, check for underground utilities to avoid accidental damage during excavation.
B. Blueprinting Your Dream Shed
Create detailed blueprints, including precise measurements of all walls, doors, windows, and roof structures. Specify the type of materials you intend to use, and don’t hesitate to consult with a professional if your design is complex. Software programs can greatly assist in visualizing your shed and refining your plan. Remember to account for the weight of your intended contents when designing the structural elements.
2. Choosing the Right Materials: Strength and Longevity
The materials you select directly impact your shed's durability. Cutting corners here will haunt you later. Pressure-treated lumber provides exceptional resistance to rot and insect infestation. For the roof, consider heavy-duty roofing felt and asphalt shingles known for their resilience against harsh weather conditions. Metal roofing offers superior longevity but demands careful handling during installation. If you want supreme durability, explore options like steel siding or vinyl cladding. These are highly resistant to damage and require minimal maintenance.
A. The Foundation's Foundation
Consider a concrete slab, concrete piers, or a robust timber frame as your foundation. A concrete slab provides superior strength and resistance to shifting ground, while piers are a cost-effective solution for well-drained soil. A timber frame, while potentially more affordable, necessitates careful treatment against rot and insect damage. The best choice depends entirely on your site and budget.
B. Sheathing and Cladding: The Protective Layers
Don't underestimate the importance of quality sheathing. OSB (Oriented Strand Board) or plywood provides structural support and a solid base for your exterior cladding. Choose a cladding material that suits your aesthetic and climate. Vinyl, metal, and fiber cement siding offer excellent durability and require little maintenance, while wood siding, while attractive, needs regular treatment to prevent deterioration.
3. Construction and Finishing Touches: Precision and Protection
Once you've meticulously gathered your materials and finalized your plans, the construction phase demands meticulous attention to detail. Follow your blueprints diligently, ensuring all joints are properly secured and all structural elements are adequately supported. Use galvanized screws and fasteners to maximize resistance to corrosion. Don't rush this step; precision translates directly into durability. Proper sealing and painting protect against moisture damage and enhances the lifespan of your shed. Pay close attention to caulking around windows and doors to prevent water infiltration.
A. Building a Solid Frame
Construct a strong and square frame. Regularly check for squareness using a measuring square to ensure your shed maintains its structural integrity throughout the construction process. Use quality lumber and properly spaced joists for the roof and floor, allowing for adequate ventilation.
B. Protecting Your Investment
Apply a high-quality sealant to all exposed wood surfaces before painting. This creates a barrier against moisture, significantly extending the life of the wood. Choose a durable exterior paint specifically designed for sheds and outdoor use to protect against UV damage, moisture, and weathering. Consider adding extra features such as a lockable door and reinforced windows for enhanced security.
By following these guidelines, you'll be well on your way to building a shed that will stand the test of time, providing years of reliable storage and satisfying the pride of a job well done. Remember that careful planning and the use of high-quality materials are the cornerstones of a durable and long-lasting structure.
Create a Low-Cost Wood Pallet Shed That Will Last for Years
Constructing a Durable and Economical Wood Pallet Shed
This article details the construction of a robust and cost-effective shed utilizing reclaimed wood pallets. While seemingly rudimentary, careful planning and execution are crucial to ensuring longevity and weather resistance. This guide provides a comprehensive overview, from material selection and preparation to advanced construction techniques ensuring a structure that will endure for years to come.

Phase 1: Material Acquisition and Preparation
The foundation of any successful project lies in the quality of its materials. For this shed, reclaimed wood pallets are the cornerstone, offering significant cost savings compared to purchasing new lumber. However, careful selection and preparation are paramount.

1.1 Pallet Selection and Sourcing
Source: Obtain pallets from local businesses, construction sites, or even through online classifieds. Prioritize pallets constructed from pressure-treated lumber, denoted by a stamp indicating the type of treatment (e.g., HT for heat treatment). Avoid pallets showing significant signs of rot, insect infestation, or extensive damage. Inspect each pallet thoroughly for broken boards, loose nails, and any warping that could compromise structural integrity.
Quantity: The number of pallets required depends on the desired dimensions of the shed. A detailed plan (discussed in the next section) is essential to accurately estimate the pallet quantity. Consider having a few extra pallets on hand to account for unforeseen damage or discrepancies during construction.
1.2 Pallet Dismantling and Cleaning
Dismantling: Carefully dismantle the pallets using a pry bar and hammer. Wear appropriate safety gear, including gloves and safety glasses, to protect against splinters and flying debris. Remove all nails and staples, ensuring no protruding nails remain. Dispose of nails and staples responsibly. Note the orientation of the boards to maintain consistency when rebuilding.
Cleaning: Thoroughly clean the reclaimed boards. Remove any dirt, debris, or loose paint chips. Pressure washing can be effective for removing stubborn dirt and grime. Allow the boards to dry completely before proceeding to the next step.
1.3 Material Inventory and Organization
Once the pallets are dismantled and cleaned, conduct a thorough inventory of the reclaimed lumber. Categorize boards based on their size, condition, and intended use (e.g., framing, siding, roofing). Organize the boards in a manner that facilitates efficient construction. This organized approach minimizes construction time and reduces the likelihood of material loss or misplacement.
Phase 2: Shed Design and Planning
Careful planning is crucial for ensuring a structurally sound and functional shed. This phase outlines the key aspects of shed design and provides guidance on creating a detailed plan.
2.1 Determining Shed Dimensions
The dimensions of the shed should be determined based on the intended use and available space. Consider factors such as the amount of storage needed, the available footprint, and local building regulations. Creating a scaled drawing is highly recommended.
2.2 Foundation Considerations
A solid foundation is essential for the longevity of any structure. For a low-cost shed, a gravel base is a viable option. Level the ground, then create a layer of compacted gravel, approximately 4-6 inches thick, to provide drainage and stability. For more demanding conditions, a concrete slab foundation is recommended, though it increases the overall cost.
2.3 Structural Framework Design
The structural framework should be designed to withstand the expected loads. Consider the use of sturdy reclaimed pallet boards for framing, prioritizing those with minimal defects. The design should include wall studs, floor joists, roof rafters, and bracing to provide stability against wind and snow loads (depending on climate). Diagrams and precise measurements are necessary during this planning stage. Create a detailed cut list to ensure you have all the necessary components.
Phase 3: Construction
With the materials prepared and the design finalized, construction can commence. This phase outlines the steps involved in constructing the wood pallet shed.
3.1 Foundation Construction
Begin by preparing the ground. Level the area, removing any vegetation or debris. Construct the gravel base (or concrete slab) according to the chosen foundation type. Ensure the base is level and compacted firmly to provide a stable foundation for the shed.
3.2 Floor Frame Assembly
Once the foundation is prepared, assemble the floor frame using the reclaimed pallet boards. Lay the floor joists, ensuring they are evenly spaced and securely fastened together. Apply pressure-treated wood for the base of the floor joists to avoid potential rot. Then, attach the floor decking, ensuring a tight and level surface.
3.3 Wall Frame Construction
Construct the wall frames using the reclaimed pallet boards. Cut the studs to the correct length and space them evenly. Use appropriate fasteners to secure the studs to the top and bottom plates. Install any necessary bracing to enhance the stability of the wall frames. Consider adding insulation within the wall framing for added protection from the elements.
3.4 Wall and Roof Assembly
Erect the wall frames on the floor frame, ensuring they are plumb and level. Secure the frames to the floor joists using appropriate fasteners. Construct the roof frame using the reclaimed pallet boards, ensuring proper rafter spacing and support. Apply roofing material (e.g., corrugated metal, asphalt shingles) to provide weather protection.
3.5 Siding and Finishing
Install the siding using reclaimed pallet boards. Arrange the boards in an aesthetically pleasing manner, paying attention to the orientation of the boards. Seal all gaps and seams to prevent water penetration. Add a door and windows (purchased separately or creatively constructed from reclaimed materials), as needed. Consider applying a protective sealant or paint to enhance the longevity and appearance of the shed.
Phase 4: Maintenance and Longevity
Proper maintenance is essential to ensuring the long-term durability of the wood pallet shed. Regular inspections and preventative measures can significantly extend its lifespan.
4.1 Regular Inspections
Conduct regular inspections of the shed to identify any potential problems such as loose boards, structural damage, or signs of rot or insect infestation. Address any issues promptly to prevent further damage.
4.2 Seasonal Maintenance
Perform seasonal maintenance, such as cleaning gutters and downspouts, repairing any damage, and applying a fresh coat of sealant or paint as needed. This helps to protect the shed from the elements and maintain its aesthetic appeal.
4.3 Pest Control
Monitor for signs of insect infestation and take appropriate measures to control any pests. Regular inspections and preventative treatments can help to protect the shed from damage caused by insects and other pests.
By following this comprehensive guide, you can construct a durable and economical wood pallet shed that will provide years of reliable service. Remember, proper planning, careful material selection, and diligent construction are key to achieving a successful outcome. The initial investment of time and effort will be rewarded with a functional and aesthetically pleasing structure built from readily available and cost-effective materials.
Free 8x10 shed designs for a compact outdoor storage solution
Free 8x10 Shed Designs for a Compact Outdoor Storage Solution
The need for efficient and aesthetically pleasing outdoor storage solutions is paramount for homeowners seeking to maximize their property's functionality. An 8x10 shed offers a compelling balance between compact footprint and ample storage capacity, ideal for various applications, from gardening tools and equipment to recreational items and seasonal decorations. This article explores several free 8x10 shed designs, emphasizing practicality, durability, and cost-effectiveness. We will delve into design considerations, material selection, and construction techniques, empowering readers to embark on their DIY shed-building projects with confidence.

Design Considerations for an 8x10 Shed
Before commencing the construction of your 8x10 shed, careful planning is crucial to ensure the project's success. Several key design aspects warrant consideration:
Site Selection and Preparation
Site selection is paramount. Consider factors such as accessibility, proximity to utilities, sun exposure, and drainage. Adequate space around the shed is essential for ease of access and future maintenance. Proper site preparation involves leveling the ground, removing debris, and potentially adding a gravel base for enhanced drainage and stability. Local building codes should also be consulted to ensure compliance with regulations pertaining to shed placement and size.
Foundation Options
The choice of foundation significantly impacts the shed's longevity and stability. Several options exist, each with its own advantages and disadvantages:
- Concrete Slab: Offers excellent stability and durability, but is relatively expensive and requires specialized skills for pouring.
- Gravel Base: A cost-effective and simple solution, particularly suitable for well-drained soil. Provides adequate drainage but may require more maintenance over time.
- Pressure-Treated Skids or Piers: A budget-friendly option that elevates the shed off the ground, improving drainage and minimizing ground contact. This approach requires precise leveling for structural integrity.
Shed Style and Aesthetics
Numerous design styles are available for 8x10 sheds, allowing for customization to match existing architectural aesthetics. Consider:
- A-Frame Shed: Offers a classic and simple design, maximizing headroom while minimizing material costs.
- Gable Shed: Features a triangular roof design, providing increased headroom and improved ventilation.
- Saltbox Shed: Characterized by an asymmetrical roofline, offering a unique aesthetic appeal and greater storage space under the longer roof slope.
The choice of exterior cladding, such as wood siding, metal sheeting, or vinyl panels, significantly influences the shed's appearance and maintenance requirements.
Door and Window Placement
Strategic placement of doors and windows maximizes functionality and ventilation. Consider the following:
- Door Size and Location: Ensure adequate clearance for accessing stored items. A double door can be beneficial for larger items.
- Window Placement: Windows improve natural light and ventilation within the shed. Consider placement to optimize light entry and minimize direct sunlight on stored items.
Free 8x10 Shed Plans and Resources
Numerous online resources provide free 8x10 shed plans, offering detailed blueprints and construction guides. These resources often include:
- Detailed Drawings: Illustrating dimensions, material lists, and cutting diagrams.
- Step-by-Step Instructions: Providing a comprehensive guide to the construction process.
- Material Lists: Specifying the quantity and type of materials required.
It is crucial to carefully review and understand the provided plans before commencing construction. Pay close attention to details such as framing techniques, roofing methods, and fastening procedures. Many free plans are available on websites dedicated to DIY projects and home improvement.
Material Selection and Cost Considerations
Material selection is a critical aspect of shed construction, directly influencing the structure's durability, cost, and aesthetics. Common materials include:
Framing Materials
Pressure-treated lumber is typically preferred for its resistance to rot and insect damage. Consider using 2x4s or 2x6s for framing depending on the desired strength and snow load requirements.
Exterior Cladding
Options include wood siding, vinyl panels, and metal sheeting. Wood siding provides a classic and aesthetically pleasing look, but requires regular maintenance. Vinyl panels are low-maintenance but may not be as durable as wood. Metal sheeting offers exceptional durability and weather resistance.
Roofing Materials
Asphalt shingles are a common and cost-effective roofing option. Metal roofing offers greater durability and longevity but is generally more expensive. Consider local climate conditions when choosing roofing materials.
Other Materials
Other materials required include screws, nails, plywood for sheathing, doors, windows, and possibly a concrete or gravel foundation.
Cost Considerations: While free plans eliminate design fees, material costs can vary significantly depending on location and material choices. Creating a detailed material list and obtaining price quotes from local suppliers is essential for accurate budgeting.
Construction Techniques and Best Practices
Constructing an 8x10 shed requires careful attention to detail and adherence to best practices. Key steps include:
Foundation Construction
Begin by constructing the foundation, carefully following the chosen method (concrete slab, gravel base, or pressure-treated skids). Ensure proper leveling for stability.
Framing and Sheathing
Assemble the wall and roof frames according to the provided plans, paying close attention to squareness and alignment. Apply sheathing to the walls and roof to provide a stable base for the exterior cladding.
Exterior Cladding and Roofing
Install the chosen exterior cladding, ensuring proper overlap and sealing to prevent water infiltration. Install the roofing materials according to manufacturer instructions.
Door and Window Installation
Install the doors and windows, ensuring proper sealing and weatherproofing.
Finishing Touches
Complete the project with finishing touches such as trim work, painting, and landscaping.
Remember to prioritize safety throughout the construction process. Wear appropriate safety gear, such as safety glasses, gloves, and hearing protection. Follow all manufacturer instructions for materials and tools.
By carefully planning, selecting appropriate materials, and following best practices, building an 8x10 shed can be a rewarding DIY project, providing a valuable addition to your property.
Affordable shed plans for first-timers
Affordable Shed Plans for First-Time Builders: A Comprehensive Guide
Constructing a shed can be a rewarding project, enhancing property value and providing valuable storage space. However, the cost of professional construction can be prohibitive. This comprehensive guide offers detailed strategies for first-time builders seeking affordable shed plans, encompassing design considerations, material sourcing, and construction techniques to minimize expenses without compromising structural integrity or aesthetic appeal.

I. Planning and Design: Laying the Foundation for Affordability
Careful planning is paramount in achieving cost-effective shed construction. Poor planning often leads to material waste, unforeseen expenses, and project delays. The initial design phase directly impacts the final cost, hence meticulous consideration is crucial.

A. Defining Your Shed's Purpose and Size
Before commencing any design work, clearly define the intended purpose of your shed. Will it serve as a simple storage unit, a workshop, or a combination thereof? This dictates the required size and internal features. Avoid oversizing; a larger shed inherently requires more materials and labor. Begin with a modest design and scale up only if absolutely necessary.
B. Selecting Suitable Shed Styles
Numerous shed styles exist, each with varying material requirements and complexity. Simple designs, such as gable or lean-to sheds, generally prove more cost-effective than intricate designs. Gable sheds, characterized by their triangular roof, offer good ventilation and ample headroom. Lean-to sheds, relying on an existing structure for support, minimize material usage and construction time. Research various styles and select the one best suited to your needs and budget.
C. Material Selection: Optimizing Cost and Durability
Material selection significantly affects the overall cost. While premium materials offer superior longevity, they come at a premium price. Consider cost-effective yet durable alternatives. Pressure-treated lumber provides excellent resistance to rot and insects, making it a suitable choice for the shed's framing. For siding, vinyl siding or metal sheeting present attractive, low-maintenance options compared to more expensive wood cladding. Roofing material choices should balance cost, durability, and weather resistance; asphalt shingles remain a popular and relatively inexpensive option.
II. Sourcing Materials: Strategies for Budget-Conscious Procurement
Procuring materials at the best possible price requires a strategic approach. Avoid impulse purchases and thoroughly compare prices from various suppliers.
A. Exploring Different Suppliers
Don't limit yourself to large home improvement stores. Consider local lumber yards, salvage yards, and even online retailers. Local lumber yards often offer competitive pricing and personalized service, while salvage yards can provide reclaimed materials at significantly reduced costs. Online retailers offer convenience and the ability to compare prices across a wider range of suppliers. Always compare quotes from multiple sources before making any purchases.
B. Utilizing Reclaimed or Recycled Materials
Incorporating reclaimed or recycled materials offers substantial cost savings and environmental benefits. Salvage yards can provide usable lumber, roofing materials, and even doors and windows at fractions of their original cost. Ensure that reclaimed materials are structurally sound before incorporating them into your shed's construction.
C. Planning Material Purchases to Minimize Waste
Precise planning minimizes material waste. Create detailed cut lists based on your chosen shed plans. This ensures you purchase only the necessary materials, avoiding excess expenditures. Consider using software or online calculators to optimize material usage and minimize waste.
III. Construction Techniques: Practical Steps for Affordable Building
Efficient construction techniques directly contribute to cost savings. Proper planning and execution minimize material waste, labor costs, and potential errors that could necessitate costly repairs.
A. Foundation Considerations: Cost-Effective Options
The foundation forms the base of your shed. While concrete foundations offer durability, they represent a significant expense. Cost-effective alternatives include gravel pads, concrete piers, or even a simple wooden frame set on compacted earth. Choose a foundation suitable to your soil conditions and shed size. Consult local building codes to ensure compliance.
B. Efficient Framing Techniques
Frame construction should be precise and efficient to minimize material waste. Utilize pre-cut lumber whenever possible to streamline the process. Accurate measurements and proper joinery are vital to ensure a strong and stable structure. Consider utilizing simple framing techniques, avoiding overly complex designs that require specialized skills and tools.
C. Utilizing Simple Tools and Techniques
Sophisticated power tools are not always necessary. Many shed construction tasks can be accomplished using basic hand tools, reducing upfront investment in equipment. Prioritize learning fundamental carpentry skills through online tutorials or workshops. This reduces reliance on costly professional labor.
IV. Seeking Assistance and Resources
While DIY shed construction offers significant cost savings, acknowledging limitations is essential. Seek assistance when needed. Consult experienced builders or utilize online forums and resources for guidance on complex aspects of the project.
A. Online Resources and Tutorials
Numerous online resources offer free shed plans, construction guides, and tutorials. Utilize these to enhance your understanding and confidence in the construction process. Thoroughly research and cross-reference information from multiple sources to ensure accuracy.
B. Seeking Advice from Experienced Builders
Consult experienced builders for advice on specific challenges. A brief consultation can often prevent costly mistakes and ensure the structural integrity of your shed. Networking with local builders can provide valuable insights and potentially identify cost-effective material sources.
C. Understanding Local Building Codes and Permits
Familiarize yourself with local building codes and permit requirements before commencing construction. Failure to comply can result in costly fines or even demolition orders. Obtain the necessary permits to ensure your project adheres to local regulations.
By diligently following these guidelines and prioritizing careful planning and execution, first-time builders can successfully construct an affordable and functional shed that meets their needs and enhances their property.
Step-by-step guide to building a secure 8x10 shed with double doors
Building a Secure 8x10 Shed with Double Doors: A Comprehensive Guide
Constructing a secure shed offers peace of mind, knowing your valuable belongings are safe and sound. This guide walks you through building a robust 8x10 shed with double doors, focusing on security features at every stage. We'll cover everything from foundation to finishing touches, ensuring your new shed is as impenetrable as possible.

Planning and Preparation: Laying the Groundwork for Security
Before you even touch a tool, meticulous planning is crucial. Start by obtaining the necessary permits from your local authorities. This seemingly simple step avoids potential legal headaches down the line. Next, choose a location that's easily accessible yet relatively inconspicuous, deterring potential thieves. Consider the ground conditions; a level, well-drained site is essential for a stable foundation. Finally, meticulously plan your shed's layout, considering placement of doors and windows for optimal security and accessibility.

Choosing the Right Materials for Superior Security
The materials you choose directly impact your shed's security. Opt for pressure-treated lumber for the frame â€" its resistance to rot and decay ensures longevity and structural integrity. For the siding, consider strong, durable materials like metal or composite panels. These offer superior protection against forced entry compared to traditional wood siding. Don't skimp on hardware; use heavy-duty hinges, sturdy door handles, and a high-quality lockset designed for exterior use. Remember, the stronger your materials, the more secure your investment.
Foundation and Framing: Building a Solid Base
A secure shed begins with a solid foundation. For an 8x10 shed, a concrete slab provides the best security and stability. Pouring a concrete slab involves excavating the area, adding gravel for drainage, and then pouring and leveling the concrete. Allow ample curing time for the concrete to reach full strength. Once the foundation is set, erect the frame using pressure-treated lumber. Ensure all joints are securely fastened with galvanized screws or bolts â€" no nails! Precise measurements and perfectly square corners are essential for a strong, secure structure.
Reinforcing the Frame for Enhanced Security
To further enhance security, consider adding extra support beams and bracing to the frame. This will significantly increase resistance against attempts to force entry. You can also install metal straps at critical joints to reinforce the structure against strong winds and potential impacts. Pay particular attention to the door frame; it will bear the brunt of any forced entry attempts. Use extra-thick lumber and reinforce it with metal plates for added protection.
Siding and Roofing: Protecting Your Investment
With the frame complete, it's time to clad your shed with the chosen siding material. Whether you opt for metal or composite panels, ensure each panel is securely fastened, leaving no gaps that could be exploited. Overlapping panels adds an extra layer of protection. The roof should be constructed with durable materials like asphalt shingles or metal roofing for weather resistance and security. Properly sealing all seams and joints will prevent water damage and further enhance the shed's overall strength.
Double Doors and Security Features: The Final Touches
Install your double doors using heavy-duty hinges rated for exterior use. Choose doors made from solid core materials, offering superior resistance to forced entry compared to hollow-core doors. Fit a high-quality, multi-point locking system that engages at multiple points along the door frame. Consider adding a deadbolt for extra security. A good quality, weather-resistant lock will ensure your belongings remain safe and sound.
Adding Extra Security Measures
To further enhance security, consider adding the following features:
- Motion-activated security lights: These deter potential intruders.
- Security cameras: Provide visual surveillance and act as a deterrent.
- Ground anchors: Secure the shed to the ground to prevent theft.
- Concealed hinges: Make it more difficult for intruders to remove the doors.
By following these steps, you'll build a secure and durable 8x10 shed that protects your valuables for years to come. Remember, attention to detail and the use of high-quality materials are key to creating a truly secure structure.
How to build a shed with detailed materials list and construction guide
Building Your Dream Shed: A Comprehensive Guide
Building a shed is a rewarding project that allows you to create valuable extra storage space or a dedicated workshop. This guide provides a step-by-step approach, ensuring a sturdy and functional shed perfect for your needs. Remember to always check local building codes and obtain necessary permits before starting your project.

Planning and Design

Choosing the Right Location and Size
First, select a suitable location for your shed. Consider factors like sunlight, proximity to power sources, and access for deliveries. Next, determine the desired dimensions. Think about the items you plan to store and allow ample space for maneuvering. Draw a detailed sketch to visualize your shed's layout, including doors, windows, and shelving.
Materials Selection: Quality Matters
Choosing high-quality materials is crucial for longevity. Opt for pressure-treated lumber to resist rot and insect damage. Consider using thicker boards for the floor and framing for extra strength. Your materials list will vary based on your shed's dimensions but should include:
- Pressure-treated lumber for the foundation, framing, and floor.
- Plywood or OSB for sheathing and roofing.
- Roofing materials (shingles, metal, etc.).
- Exterior siding (vinyl, wood, metal, etc.).
- Doors and windows.
- Nails, screws, and other fasteners.
- Concrete mix (for a concrete foundation).
- Paint or stain (optional).
Foundation Construction
Creating a Level Base
Begin by preparing the ground. Clear the area of vegetation and debris. Level the ground using a shovel and rake. For a more robust shed, a concrete slab foundation is recommended. Mark the perimeter of your shed and dig a shallow trench. Pour and level the concrete, ensuring a perfectly flat surface. Allow ample time for the concrete to cure completely before proceeding.
Alternative Foundation Options
If a concrete slab is impractical, consider alternative foundation options such as gravel pads or pier blocks. A gravel pad involves laying down a layer of gravel and compacting it firmly. Pier blocks provide a solid base supported by individual blocks, reducing the need for extensive excavation. Remember to ensure a level and stable foundation for any chosen method.
Framing and Sheathing
Constructing the Frame
Once the foundation is set, build the shed's frame. Begin by constructing the floor frame, using pressure-treated lumber. Then, erect the walls, carefully ensuring squareness and plumbness at each corner. Use a level and plumb bob regularly to maintain accuracy. Reinforce the frame with bracing for extra stability.
Adding the Sheathing
Next, attach the sheathing. Plywood or OSB sheets are commonly used. Ensure proper overlap and secure them with nails or screws. Pay close attention to aligning the sheets correctly and spacing the fasteners appropriately. This step creates a solid surface for the siding and roofing.
Roofing and Siding
Installing the Roof
Now it's time for roof construction. Assemble the roof trusses or rafters according to your design. Carefully lift them into place and secure them to the top plate of the walls. Install sheathing over the trusses, creating a solid base for your chosen roofing material. Finally, install your shingles, metal roofing, or other chosen material following manufacturer instructions.
Applying the Siding
The final exterior step is installing the siding. Whether you're using vinyl, wood, or metal siding, follow the manufacturer's instructions carefully. Ensure proper overlap and secure the siding with nails or screws. Maintain consistent spacing and alignment for a professional finish.
Finishing Touches
Installing Doors and Windows
Now, install the doors and windows. This involves precise measurements and careful fitting. Use appropriate hardware and seal around the frames to prevent drafts and water leakage. Ensure the doors and windows operate smoothly and securely.
Adding Finishing Details
To complete your shed, consider adding finishing touches like painting or staining the exterior and interior. Install shelving and any other desired interior features. This will personalize your shed and make it more functional. A final cleanup leaves you with a stunning new addition to your property.
Building your own shed is a challenging but incredibly satisfying experience. With careful planning and attention to detail, you can create a valuable structure that will serve you for years to come.
Beginner-friendly backyard shed plans
Beginner-Friendly Backyard Shed Plans: A Comprehensive Guide
Constructing a backyard shed is a rewarding project that enhances both the functionality and aesthetic appeal of your property. While the prospect might initially seem daunting, with careful planning and execution, even novice DIY enthusiasts can successfully build their own shed. This comprehensive guide provides detailed, beginner-friendly plans, covering every step of the process from initial design considerations to final finishing touches. We will focus on a straightforward, robust design suitable for various skill levels.

Phase 1: Planning and Design
The foundation of any successful shed construction lies in meticulous planning. Before you even pick up a tool, dedicate ample time to designing your shed. This phase involves several key considerations.

1. Defining Your Shed's Purpose and Size
The first step is determining the primary function of your shed. Will it serve as storage for gardening tools and equipment? A workshop for small projects? Or a combination of both? The intended use directly impacts the required size. For beginners, a smaller shed (approximately 8ft x 6ft) is recommended due to its manageable size and reduced complexity.
2. Selecting the Right Location
Choose a location that is level, accessible, and compliant with local building codes and homeowner association regulations. Consider proximity to utility lines, drainage patterns, and sunlight exposure. Ensure adequate space for future access and maneuverability. A level, well-drained spot is crucial for a stable foundation.
3. Material Selection
For beginners, pressure-treated lumber is a highly recommended choice. Its resistance to rot and insect infestation simplifies maintenance and extends the shed's lifespan. Consider using standard dimensions (e.g., 2x4s, 2x6s) for easier construction and readily available materials. Hardware selection should also be planned in advance. High-quality screws and nails are essential for a secure and durable structure.
4. Obtaining Necessary Permits
Always check with your local authorities to determine whether a building permit is required for your shed project. Failing to obtain necessary permits can result in fines or even demolition orders. The permit application process might vary depending on your location, shed size, and building codes.
Phase 2: Foundation Construction
A solid foundation is paramount for the longevity and stability of your shed. Several options are available, each with varying levels of complexity.
1. Concrete Slab Foundation
This provides the most robust and level base. However, it requires specialized tools and materials, and can be more expensive and labor-intensive. For beginners, this might be best left to professionals or a more experienced DIYer.
2. Gravel Base Foundation
This is a simpler and more cost-effective alternative. It involves excavating a level area, laying down a layer of gravel, compacting it, and then placing pressure-treated lumber directly on the gravel. This method is suitable for lighter sheds and less demanding soil conditions. Ensure proper drainage is incorporated.
3. Concrete Pier Foundation
This is a compromise between the slab and gravel base. It involves pouring individual concrete piers at each corner and load-bearing points of the shed. These piers provide a stable base while minimizing the amount of concrete needed compared to a full slab.
Phase 3: Frame Construction
The frame forms the skeleton of your shed. Accuracy is key at this stage to ensure a square and structurally sound building.
1. Building the Floor Frame
Using your chosen pressure-treated lumber, construct a rectangular frame according to your dimensions. Ensure that all corners are square using a speed square or other measuring tools. Properly fasten the lumber using appropriate screws or nails. Lay down plywood sheeting on top of the frame for the flooring.
2. Erecting the Wall Frames
Construct individual wall frames, ensuring they are plumb and square. Use the appropriate size lumber based on the shed's dimensions and desired strength. Remember to account for door and window openings during the framing process. Pre-assembling the wall frames before lifting them onto the floor frame significantly streamlines the process.
3. Assembling the Roof Frame
The roof frame design can vary depending on personal preference and shed dimensions. Common options include a gable roof (triangular shape) or a shed roof (single slope). Construct the roof trusses or rafters according to your chosen design and secure them to the top plates of the wall frames. This is often the most complex part of framing, so take your time and ensure accuracy.
Phase 4: Sheathing and Roofing
Once the frame is complete, you can begin sheathing the walls and roof. This provides a weatherproof barrier and a surface for the exterior cladding.
1. Wall Sheathing
Use plywood or OSB (Oriented Strand Board) for sheathing the walls. Ensure that the sheets are properly fastened and aligned. Properly sealing all joints and gaps is crucial for weather resistance.
2. Roof Sheathing
Similarly, sheath the roof with plywood or OSB, ensuring proper overlap and secure fastening. This forms the base for the roofing material.
3. Roofing Material Installation
Choose a roofing material that suits your budget and aesthetic preferences. Asphalt shingles are a popular choice for beginners due to their ease of installation and affordability. Follow the manufacturer’s instructions carefully during installation.
Phase 5: Finishing Touches
The final phase involves adding the finishing touches to your shed, transforming it from a basic structure into a functional and appealing addition to your backyard.
1. Exterior Cladding
Apply exterior cladding, such as siding, to enhance the shed’s appearance and provide additional weather protection. Various materials are available, each offering unique benefits and aesthetic qualities.
2. Door and Window Installation
Install the pre-hung door and windows, ensuring they are properly aligned and sealed to prevent drafts and moisture penetration.
3. Interior Finishing
Consider adding interior finishing such as paint, shelving, or wall paneling to enhance functionality and aesthetics. This allows for customization to meet specific storage needs.
Conclusion
Building a backyard shed is a rewarding experience that provides valuable skills and a tangible accomplishment. While it demands time and effort, this beginner-friendly guide offers a clear pathway to successfully construct your own shed. Remember to prioritize safety, plan carefully, and take your time; the result will be a functional and attractive addition to your property for years to come. Always remember to consult professional resources and seek assistance when needed; don't hesitate to ask for help from more experienced DIYers if you encounter difficulties.
How to Build a Wood Pallet Shed: Simple Plans for Maximum Storage
How to Build a Wood Pallet Shed: Simple Plans for Maximum Storage
Hey there, fellow DIY enthusiasts! So you're thinking about building a shed, but the price tags at the big box stores are making your wallet weep? I get it. Building your own shed can be a fantastic way to save money and get exactly the storage space you need. And what's even better? You can do it using reclaimed wood pallets! Let's dive into how you can build a surprisingly sturdy and attractive shed using this readily available and budget-friendly material.

Planning Your Pallet Shed: Size and Location
Before you even think about grabbing a hammer, some careful planning is key. This isn't rocket science, but a bit of forethought will save you headaches down the line.

Choosing the Right Size
How much stuff do you need to store? A small shed might be perfect for gardening tools, while a larger one could house lawnmowers, bikes, and even a workbench. Think about your needs, and sketch out a basic plan. Remember that pallets are typically 48 inches wide and 40 inches deep, so your design will be dictated by pallet dimensions to a significant degree. Start with a simple rectangular shape for ease of construction; you can always get fancy later!
Picking the Perfect Spot
Where will your shed live? Make sure you have enough space, consider access for delivery of the pallets, and check your local building codes. You'll need a level surface, and consider sun exposure and drainage â€" you don't want a soggy shed! Ideally, a location near an existing power source will make future electrical work much simpler.
Gathering Your Materials: More Than Just Pallets
Okay, so you've got your plan and location sorted. Now let's talk materials. While pallets are the stars of the show, you'll need a few other things to bring your shed to life.
The Pallet Hunt
Source your pallets responsibly! Look for pallets marked "HT" (heat treated) â€" these are safe for indoor and outdoor use. Avoid pallets marked "MB" (methyl bromide treated) as they can contain harmful chemicals. You can often find free pallets behind businesses or construction sites, but always ask for permission first. You'll likely need quite a few â€" the exact number will depend on your shed's size.
Essential Tools and Materials
Besides the pallets, you’ll need:
- Measuring tape
- Level
- Hammer or nail gun (a nail gun will dramatically speed up the process!)
- Screws or nails (long, heavy-duty ones are best)
- Post hole diggers (if you are securing the shed to the ground)
- Concrete mix (if you are using concrete for the base)
- Saw (circular saw is ideal, but a hand saw will do the job if you're patient)
- Safety glasses and work gloves
- Optional: Roofing felt or tar paper for waterproofing
- Optional: Plywood or OSB for sheathing (for a more finished look)
- Optional: Paint or stain for weather protection and aesthetic appeal
Building Your Pallet Shed: A Step-by-Step Guide
Alright, let's build! This is a simplified guide, and adjustments may be necessary depending on your design and the condition of your pallets.
Creating the Foundation
A solid foundation is crucial. You have a few options: a simple gravel base, concrete blocks, or a poured concrete slab. For a basic shed, a leveled gravel base will suffice. For something more permanent, concrete blocks or a slab are recommended. Ensure your base is level before proceeding.
Constructing the Walls
Start by assembling the walls using the pallets. You may need to cut some pallets to fit your dimensions. Secure the pallets together using screws or nails. Remember to consider the door placement during this stage. You can create a door frame using extra pallet wood, or by carefully removing some sections from existing pallets.
Building the Roof
The roof design depends on your preferences and skills. A simple gable roof is easiest for beginners. You can construct the roof trusses using additional pallet wood or purchase pre-made trusses for a more structurally sound roof. Once the trusses are in place, cover them with roofing felt or tar paper for waterproofing and then add your chosen roofing material. Consider using inexpensive corrugated metal sheets.
Adding the Finishing Touches
Once the main structure is complete, it's time for the finishing touches. Consider adding a door, windows, and shelving. You can use extra pallet wood for these features. Don’t forget to weatherproof your shed with a coat of paint or stain to protect it from the elements and enhance its appearance. You might even consider adding a simple latch or lock to keep your belongings secure.
Addressing Potential Challenges
Building a pallet shed is a rewarding project, but you might run into some snags. Here are a few common issues and how to address them:
Uneven Pallets
Pallets can be uneven, so you may need to shim them during construction to ensure everything is level and plumb. Use small wood scraps to level out any inconsistencies.
Loose Nails and Screws
Use high-quality screws and nails and ensure they are properly secured. Consider predrilling pilot holes to prevent splitting the wood, especially with harder woods.
Weather Protection
Always use appropriate weatherproofing materials and techniques. Consider a sealant to prevent water damage and maintain the integrity of the structure for years to come.
Commonly Asked Questions
Let's tackle some frequent queries:
- Q: How long does it take to build a pallet shed? A: The time it takes depends on the size and complexity of your shed, your DIY experience, and the availability of your tools. A basic shed might take a weekend, while a larger, more complex one could take several days or even longer.
- Q: How much does it cost to build a pallet shed? A: The cost primarily depends on whether you can source free pallets. Otherwise, expect to pay a small amount per pallet. The other materials will add to the cost, but it should be significantly less expensive than a store-bought shed.
- Q: Are pallet sheds durable? A: While pallets aren't treated lumber, a well-constructed pallet shed can be surprisingly durable, especially if you properly weatherproof it. Its longevity will depend on the quality of the pallets used and your construction techniques.
- Q: Do I need any permits to build a shed? A: Building codes vary by location. Check with your local authorities to see if a permit is required for your shed project before you begin.
- Q: Can I add electricity to my pallet shed? A: Absolutely! This would require additional wiring and an electrical outlet, and it's always best to consult with an electrician or follow local electrical codes for a safe setup.
There you have it! Building your own pallet shed is a fantastic way to create valuable storage space while saving money and flexing your DIY muscles. Remember to prioritize safety, plan meticulously, and have fun with the process! Happy building!